Fireside Lounge IMP Stations
Basic Information
Only two installed wireless microphones (One of the following combinations: Handheld + Handheld, Handheld + Lapel, or Lapel + Lapel) may be used in this room. There are no additional microphone inputs.
The Fireside Lounge IMP station has TWO sound system modes:
- Normal daily operation (Default)
- Films
- Conferences or presentations
- Performance mode
- Password protected for switching between modes
- Used for special events such as Midnight Pizza or Open Mic Night
- Requires use of "Sound System - Small w/ Sm Stage Rack"
- OPTIONAL: JBL subwoofer(s)
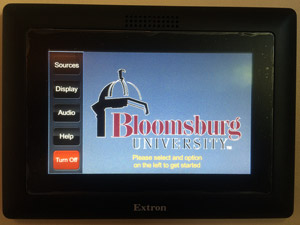
All available technology is controlled via a touch panel mounted in the lectern. Controls include:
IMP Station Technology
- Touch panels (two locations, password protected)
- System / Configuration
- System Power On / Off
- Mode switching
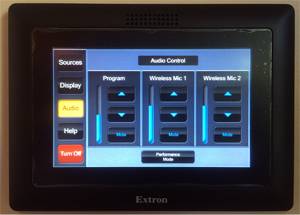
- Audio Controls
- Overall program volume (everything)
- Wireless mic #1 and #2 volume levels and mute
- Video Source volume
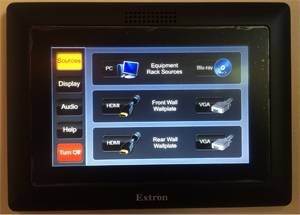
- Video Controls
- Video source selection: Computer, Blu-ray player, Auxiliary HDMI input, Auxiliary VGA input
- Projection screen up/down/stop
- System / Configuration
- Computer (with presenter monitor, wireless keyboard & mouse, and presentation mouse)
- Blu-Ray player (will play DVDs)
- AV switcher – DON’T TOUCH!
- Drawers
- Wireless mics (both handheld and lapel)
- Handheld wireless mic clips
- New batteries
- Extra lapel mic clips
Room Technology
- Ceiling-mounted speakers
- Two wireless microphones in one of the following configurations:
- 1 wireless handheld + 1 wireless lapel
- 2 wireless handhelds
- 2 wireless lapels
- One ceiling-mounted projector.
- One ceiling-mounted projection screen.
NOTE: Only two installed wireless microphones (One of the following combinations: Handheld + Handheld, Handheld + Lapel, or Lapel + Lapel) may be used in this room. There are no additional microphone inputs.
Storage & Connections
- IMP station must remain plugged in (both power and data/control).
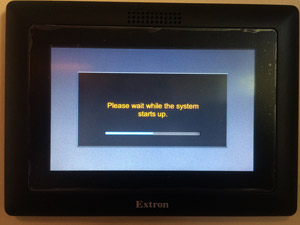
- IMP station requires 2-5 minutes to fully boot up after re-energizing the IMP station.
- Shutdown the system using either of the touchpanels ONLY. DO NOT SWITCH OFF THE MAIN POWER CONDITIONER AT THE TOP OF THE RACK. THE IMP MUST REMAIN ENERGIZED.
- Shutting down the system powers down the projector, and raises projection screen.
Setup Considerations
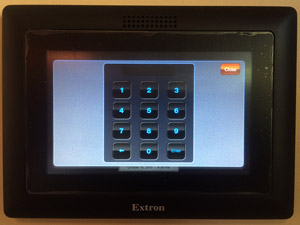
- Accessing or using the IMP station requires entering a password.
- The system defaults to normal daily operation mode.
- There are no microphone inputs available in the Fireside Lounge. Only 2 wireless mics are available.
Normal Daily Operation Mode (Default)
| Setup Step | Image |
|---|---|
 |
|
 |
|
 |
|
 |
|
|
|

|
|

|
Performance Mode
| Setup Step | Image |
|---|---|
| 1) Using one of the Touchpanels, switch system to Performance mode. | |
| JBL Subwoofers (Complete steps for both subwoofers) 2) Place subwoofers below white ceiling speaker closest to performance area. |
- JBL subwoofers (Complete steps for both subwoofers)
- Place subwoofers below white ceiling speaker closest to performance area.
- Using a universal power cable, connect to nearest power outlet.
- Using a 10ft mic cable: Connect female end to Ch1 input of subwoofer. Connect male end to nearest single-female XLR connection wallplate.
- Power on the subwoofer using the rocker switch.
- IMPORTANT! --> Align each front end (face) of the subwoofers with the top horizontal corner of its corresponding white ceiling speaker.
- IMPORTANT! --> Make sure that both subwoofers are at the same volume. The volume should be set between the lowest point (zero) and the first large hash mark.
- Using two 10ft mic cables: Connect the stage rack's main output A to the Performance I/O panel's Left Main Input. Connect the stage rack's main output B to the Performance I/O panel's Right Main Input.
- If volume control of IMP station is required while using performance mode, one or more additional wireless mics are required
Troubleshooting
| Problem: | The Touchpanel on the wall is blank or not powered on. |
|---|---|
| Possible Cause(s): |
|
| Best Solution (Permanent): |
|
| Temporary / Immediate Solution |
|
| Problem: | No Sound is being heard. |
|---|---|
| Possible Cause(s): |
|
| Best Solution (Permanent): |
|
| Temporary / Immediate Solution |
|
| Problem: | The computer in the IMP station can't connect to the internet. |
|---|---|
| Possible Cause(s): |
|
| Best Solution (Permanent): |
|
| Temporary / Immediate Solution |
|
| Problem: | The Touchscreen(s) show "Waiting for Sync". |
|---|---|
| Possible Cause(s): | Loss of power to the main AV rack. |
| Best Solution (Permanent): | Open the rear AV rack door and power cycle the Extron DTP Crosspoint 84. This involves simply pulling the power cable from the DTP 84 ONLY - do not turn anything else off. Unplug the DTP 84 for approximately 20-30 seconds, then plug it back in. Regular wall panel operation may take up to 10 minutes to return to normal. Once the wall panel returns to normal, start up the system regularly, then power it down again. After these steps the system should be OK. |
| Temporary / Immediate Solution |
Use a Presentation cart or separate laptop and projector. |
| Problem: | No image on the screen despite selecting Source. |
|---|---|
| Possible Cause(s): | The Extron DTP Crosspoint 84 lost synchronization or there was a loss of power to the main AV rack. |
| Best Solution (Permanent): | Open the rear AV rack door and power cycle the Extron DTP Crosspoint 84. This involves simply pulling the power cable from the DTP 84 ONLY - do not turn anything else off. Unplug the DTP 84 for approximately 20-30 seconds, then plug it back in. Regular wall panel operation may take up to 10 minutes to return to normal. Once the wall panel returns to normal, start up the system regularly, then power it down again. After these steps the system should be OK. |
| Temporary / Immediate Solution |
Use an external laptop/Blu-Ray and projector or presentation cart. |