
Ballroom Theatrical Lighting
Basic Information
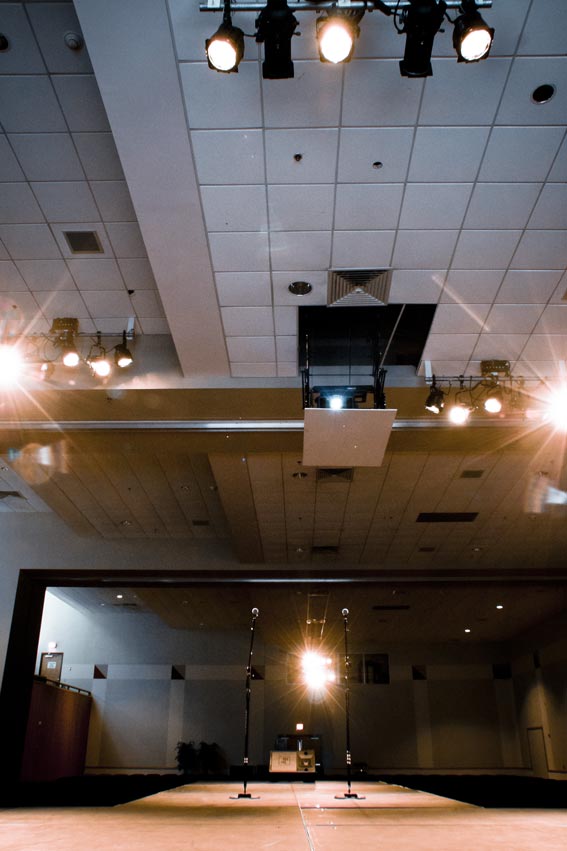
Special permission is required to use this equipment. Available in Ballroom 1 (408-1) only. Technical personnel is REQUIRED for the use and operation of this unit. Lights must be focused using an aerial personnel lift to accommodate event setup prior to start of an event.
Setup Considerations
Requires focusing lights for specific setups or room configurations. Some lights may be used to light lecterns or presentation areas at last minute.
Troubleshooting
- Problem: The lighting console does not boot up, and it beeps and the power button flashes three times. Likely cause: The RAM inside the console has become loose or unseated. Solution: Open the unit (unplug it from power first), and reseat the RAM module.
- Is the main breaker powered on completely?
- Is the Main fader (Grand Master, "GM") fully upward?
- Is the desired fader(s) raised?
Resources:
Hanging and focusing theatrical lighting instruments
While hanging and focusing the theatrical and portable lighting always Wear gloves to avoid burns. If possible focus the instrument at 50% brightness to minimize heat exposure. Do not look directly into the lighting instrument.
- Using the Handy Herman personel lift (see also Other Equipment), take the fixture to your hanging batten (light bar) or truss. Using a wrench to turn the small bolt of the C clamp, open the C of the C-clamp enough that it the bar will fit inside the C. Place the C of the C-clamp over the bar. Once the C is over the bar, finger-tighten the small bolt until it closes onto the bar. Allow the lighting instrument to hang freely. Using a wrench, tighten the small bolt until it firmly grips the pipe.
- IMPORTANT! Open the safety cable's carabiner clip. Wind the safety cable through the yoke and over the the bar. Attach the clip back in place. Loosen the wing nuts on each side of the yoke until the yoke moves easily but with some bite. Pull the four shutter fans out from the barrel. These are four identical handles toward the mid section of the barrel--one on each side.
- Plug the light into a power source. When the instrument is lit, point the nose (front) toward the place you wish to light on the stage. Hold it in place with one hand while you tighten the yoke wing nuts.
- Twist the wing nut on front top of the body until it is slightly loose. Now grasp the barrel and slide it in and out to adjust the focus. You will notice that the beam's projection softens and widens or narrows and hardens as you move the barrel.
- Tighten the wing nut back up when you have the desired focus. You can now further shape the light by moving the shutter fans in, out, up and down as desired.
Ballroom Theatrical Lighting Operation
Part 1: System Power
Location: Ballroom Projection Booth
Required equipment:
- Theatrical lighting breaker box.
- ETC Element lighting console.
Turn on System Power Steps
- Energize the theatrical lighting dimmer rack. Power-on the theatrical lighting breaker box.
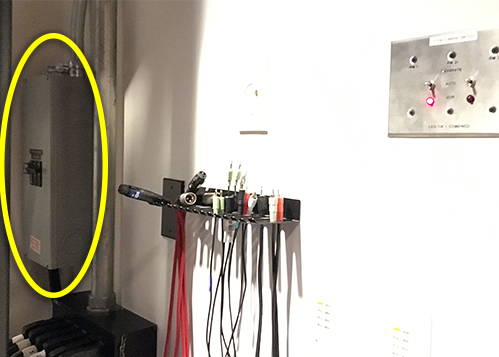
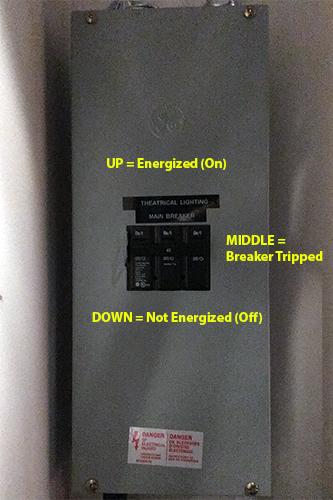
- Identify the gray theatrical lighting breaker box located near the corner of the large window. It is labeled "Theatrical Lighting Main Breaker" (Figure 1.1.1.).
- Move the black breaker switch to the upward ON position (Figure 1.1.2.). Be certain that the switch is positioned fully upward and not halway between the ON and OFF position. If the switch is not switched upward to the fully ON position, return the switch to the downward OFF position and repeat the power on motion.
- Energize the ETC Element lighting console.
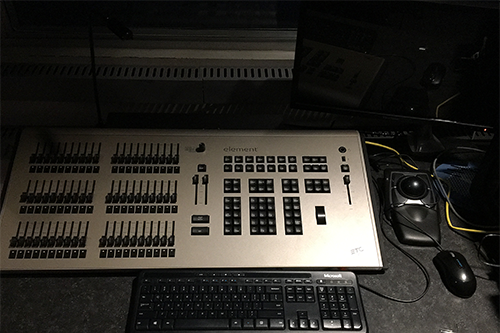
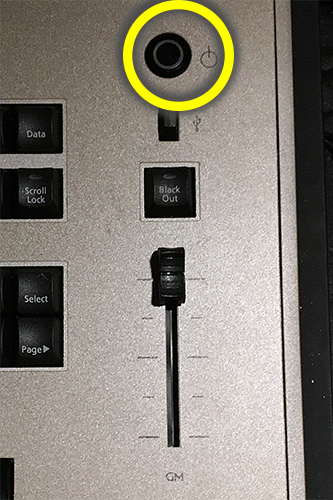
- Locate the ETC Element lighting console. It's located on the desk near the spotlight (Figure 1.2.1.).
- Locate the round power button on the upper right of the lighting console (Figure 1.2.2.).
- Push the console's power button. Lights on the board will illuminate. The computer screen will display startup screens and will display a count-down.
Part 2: Navigating to the Show File "KUB 408 Standard"
Required equipment: The ETC Element lighting console.
Determining How to Proceed
After powering on the Theatrical lighting main breaker and the ETC lighting console, you have to open (or make sure that it's open) the show file named "KUB 408 Standard".
Scenario 1
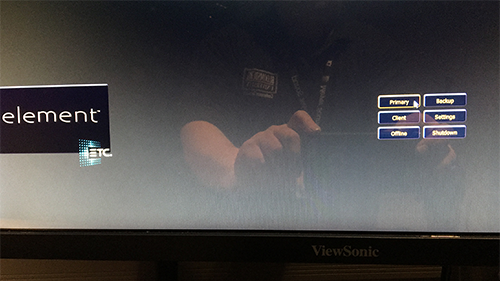
FIRST: If, after powering on the console, you see a screen similar to that of Figure 2.0.1, then continue to SECOND. If this is not the screen that you see, continue to Scenario 2.
SECOND: Identify whether the active show file is named "KUB 408 Standard" (Figure 2.0.2). Do this by looking at the center of the bar across the top of the screen (Figure 2.0.1). If it is, continue to PART 3: Operate Submasters. If it is not, then go to Navigate to Show File "KUB 408 Standard" Steps. In both cases skip Scenario 2.

Scenario 2
If, after powering on the console, you did not see the screen in Figure 2.0.1, then you should see the screen in Figure 2.0.3. If, so, then click the "Primary" button. Clicking the Primary button should take you to a screen from the last active show file.
Identify whether the active show file is named "KUB 408 Standard" (Figure 2.0.2). Do this by looking at the center of the bar across the top of the screen (Figure 2.0.1). If it is, continue to PART 3: Operate Submasters. If it is not, then go to Navigate to Show File "KUB 408 Standard" Steps.
Navigate to Show File "KUB 408 Standard" Steps
- Push the "Display" button on the console (Figure 2.1.1).
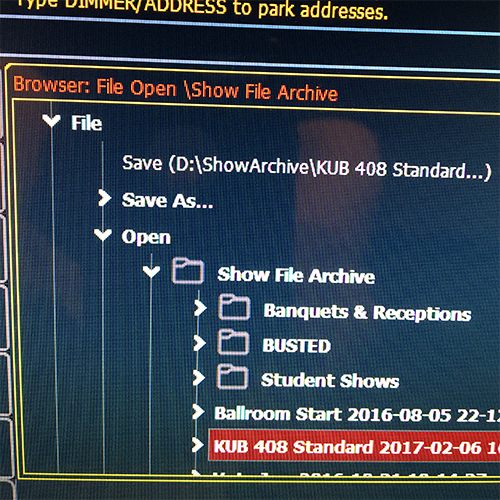
- Identify the browser window that looks like Figure 2.2.1.
- Click the arrows to the left of the menu choices until you get to the "KUB 408 Standard..." show file (highlighted in red in Figure 2.2.1). The folder structure should be something like:
File\Open\Show File Archive\KUB 408 Standard.... - Double-click to open the show file named "KUB 408 Standard...". Click OK or YES for any prompts asking if you are sure that you want to open this file.

Part 3: Operate Submasters
Required equipment: The ETC Element lighting console.
Activate Fader Submaster Function
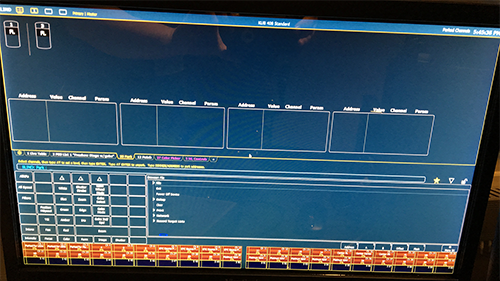
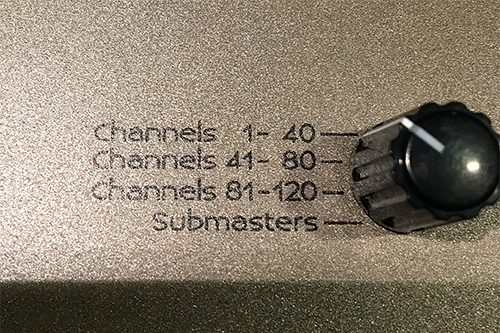
Rotate the knob in Figure 3.1.1 to "Submasters".
Use Faders to Control Theatrical Lighting Illumination
Use the top left row of faders to raise or lower pre-configured groups of theatrical lights. Notes on specific submaster channels to use will be included in Event Shift Reports.
Theatrical Lighting Shutdown Instructions
Power shutdown order:
- ETC Element lighting console
- Theatrical lighting breaker
Part 4: Shutdown ETC Element Lighting Console
In the browser window (Figure 4.1.1.), choose "Power Off Device". The console will commence its shutdown procedure and power down.

Part 5: Theatrical Lighing Breaker
De-energize the theatrical lighting dimmer rack. Power-off the theatrical lighting breaker box.
- Identify the gray theatrical lighting breaker box located near the corner of the large window. It is labeled "Theatrical Lighting Main Breaker" (Figure 1.1.1.).
- Move the black breaker switch to the downward OFF position (Figure 1.1.2.). Be certain that the switch is positioned fully downward and not halfway between the ON and OFF (breaker tripped) position. If the switch is not switched to the fully OFF position, return the switch to the upward ON position and repeat the power off motion.