
Inter-building Radio Communications
KUB two-way radio communications call numbers:
Use the call numbers below while transmitting on channel FOUR (4).
- 1 – Student Activities Professional Staff (Student Activities office, Kristi Getty, Michelle Slusser, etc.)
- 2 – Student Supervisors
- 3 – Custodians. Switch to channel THREE (3) (below) to contact Custodians. Remember to switch back to channel 4 for regular operations use.
- 4 – Welcome Desk
- 5 – Games Room
- 6 – Operations / Setup Crew
- 7 – Grad Assistants
- 8 – Tech Crew / Ken Dunlap
- 10 – Bill Perkins, Assistant Director of Student Activities, Building Operations.
Radio Channels:
- 1 – BUPD (Emergency Channel Only)
- 2 – Campus Alert
- 3 – KUB Custodians (Switch to this channel to contact Custodians)
- 4 – KUB 1 - KUB Operations (Use this for daily operations)
- 5 – KUB 2 - Tech only. Used to communicate during events or performances requiring multiple workers.
Radio Responsibilities
- Always keep them with you. If you or someone else sets down a radio pick it back up and return it to the Student Activities office.
- Place them correctly in the charger (the light should come on red and steady); make sure they are turned off while charging (the battery will last longer).
- Always keep the radios on and at an easily audible level (so that you can hear it!).
- If a radio is not working properly, include the information in a shift report AND tell Kristi, Bill, Michelle Slusser, or Ken.
Radio Operations
See also the Motorola XPR 3500e user guide.
Communication Protocol
Initiating Radio Calls
To initiate calls over the radio (transmitting):
- Say: [the number of your work group], "to", [the number of the work group you are trying to reach]. Example: "Eight to Two". In this example, Tech Crew (8) is calling the Student Supervisors (2).
- Wait for a reply. Always wait for a reply so that you are confident that the person acknowledges your radio call.
- When the person answers, state your message.
Receiving calls over the radio:
- Acknowledge the call by saying "Go ahead", or "This is eight".
- Wait for the person to state their message.
- Acknowledge that you heard and understand the message. For example, say "OK". Ackowledging that you heard and understand the message demonstrates to the sender that you received the message clearly, there was no interference in communicating the message, and that they do not have to attempt to contact you again.
Protocol
- NEVER EVER transmit sensitive information over the radio. Sensitive information includes, but is not limited to: lock/safe combinations, passwords, social security/personnel numbers, money amounts, and money/cash transfers from one location to another. Radio communications can be overheard by anyone and you never know who is around persons working throughout the building. Transmitting sensitive information increases the chances of theft and threatens the personal security of other persons in the building.
- ENVER EVER swear or use foul language over the radio. This is against Federal Commmunications Commission (FCC) regulations. Being caught swearing or using foul language over the radio may result in disciplinary actions including termination, and being fined by the FCC.
- Radio communications are for serious work-related responsibilities only. Do not joke, banter, or play games over the radio.
Settings
In order to use the radio for KUB internal communications:
No Picture |
|
Operation
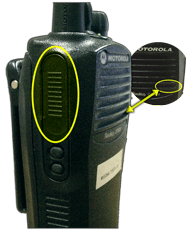
Incoming radio transmissions are monitored via the speaker located on the front of the radio.
In order to broadcast an outgoing radio transmission:
 |
|
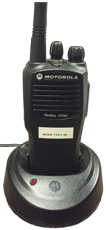
Recharging the Battery
|
It is important to always charge the battery after use so that all workers can easily and accurately communicate at all times using the radio. At the end of the night, turn off the radio before placing it in the charger. This allows the battery to charge faster and, more importantly, prolongs the life of the battery. REMEMBER TO TURN ON THE RADIO IN THE MORNING! In order to charge the battery, the radio must be correctly seated in the charger. The radio is correctly seated in the charger and the battery is being charged when the red light located on the charger base is illuminated. |
 |
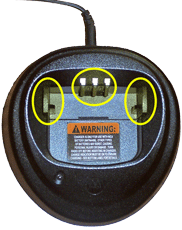 |
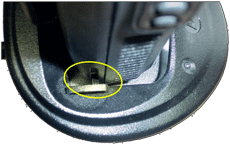
All three metal contacts on the charger must be touching the corresponding contacts on the radio. They're shiny so don't get distracted. Contacts on the charger base: are located in the center of the rear of the charging well. Contacts on the radio: are located near the bottom of the rear of the radio. |
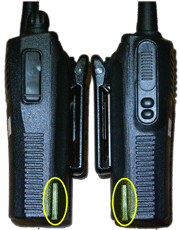
Guide tabs are located on both inner sides of the charger well. Corresponding guide slots are located on both outer sides of the radio. |
 |
 |
When inserting the radio into the charger, insure that both of the charger’s guide tabs are inserted into both of the radio’s guide slots. If the radio does not fit, the charger's guide tabs can be reversed. Squeeze both sides of the charger's guide tabs inward to the center of the charger. Pull out the guide tab insert. Reverse the guide tab insert and replacde it into the charger. Insert the radio into the charger. |
The radio is correctly seated in the charger and the battery is being charged when the red light located on the charger base is illuminated. |
|