Taping Cables
General Guidelines
- Use the shortest cable possible, while leaving 3-5ft slack on each side, to prevent RF interference and cluttered setups.
- Keep cables loose and relaxed with approx. 3-5ft slack on each side. Leaving slack on each side of the cable enables a user/presenter to move equipment around during an event or presentation without tearing up the tape and causing a jumbled mess from the tape sticking to the cable(s).
- Always test the cable prior to taping it down.
- Cables must look nice and presentable using straight runs and 90 degree corners.
- Do not step on or run over cables with equipment. This can break the wires inside the cable and make the cable not work.
- Do not run sound cables and power cables or lighting cables parallel (side by side) to each other. If cables absolutely must cross each other, make them cross at one point only. This practice helps to eliminate the 60 Hz hum that will occur if too many power cables are run alongside sound cables.
Use Gaff Tape to tape down cables.
Goals of taping cables are to:
- Prevent tripping hazards, and
- minimized the area that event attendees must walk over or avoid.
IMPORTANT! - Make sure that you have tested the connection and that it works as intended prior to taping cables. Otherwise you will have to tear up the cable and tape, thus wasting time and tape (which is over $12 per roll).
Steps to Tape Cables
- Run your cable(s) across the area to be taped down.
- Gently pull the cable in a straight line.
- Using a small length of gaff tape, tape each end of the cable to hold it in place (if the distance is long, you may want to add a few strips along the length of the cable).
- Using tape lengths of about 3-4 ft (or continuously using the tape roll), tape the remainder of the cable(s) down by pressing tape around the cable and onto the floor.
- Cable runs with multiple cables can be taped using wider tape or may be taped in sections.
Gaffer Tape (6:33)
Taping Down Cables (4:03)
#008 - Gaff Tape - How to Gaff like a Pro.
The GaffGun may also be used to tape down long cable runs. See GaffGun promotional video below.
Examples of Bad Tape Jobs
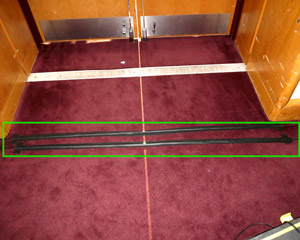
Figure 5 shows two audio cables that should have been run next to and touching each other and taped down together.

Figure 6 shows two AC (electrical) extension cables that should have been run next to and touching each other and taped down together. The green box indicates the unnecessarily large are that must be avoided, and the yellow boxes indicate that the cables should have been run and taped as close to the walls as possible.
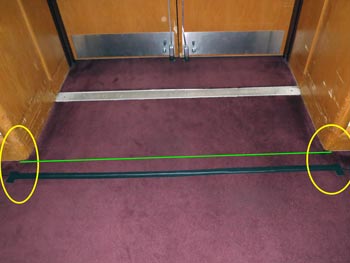
Figure 7 shows an audio cable that has been taped down too far away from the threshold of the doorway. The green line indicates how the cable should have been run and taped down. The yellow circles indicate the distance from the door's threshold.

Figure 8 shows a speaker cable that was incorrectly taped down. Problems with this setup include:
- The cable is taped over the moveable carpet. If the carpet was moved, then the cable would be exposed and cause a tripping hazard. NEVER tape cables over moveable carpets.
- The area that is taped is behind a partition that is intended to block views of backstage. Thus people will not be walking through that direction. This nullifies the effort of taping down the cable in this manner.
- Much of the cable is exposed in an area that performers will be walking through. This setup actually increases the chance of tripping accidents and cable damage from persons walking over the cable.
- The partition should have been straightened as much as possible along the yellow line. The cable could then be run alongside the partition along the yellow line, or over the partition's wheels because people would not be walking closely to the partition. Running the cable over the partition wheels would have saved tape and time because the cable would not really have to be taped if it was occupying an area that people were not walking through.

Figure 9 shows a cable that has been incorrectly set on a stage and behind a podium.
- WRONG: Do not tape a cable between the cracks of a stage. Persons walking on the stage cause the stage to shift and therefore the cracks will shift. The cable can fall further into the cracks and become crushed. Crushing a cable breacks the cable and makes it unusable.
- WRONG: Do not tape a cable in the center behind the podium. Persons speaking at the podium stand behind the podium. Persons giving presentations may constantly step on the cable - crushing the cable and making it unusable - or they may trip over the cable.
- SOLUTION 1: Run the cable to one side behind the podium and an area that you believe it is not likely or less likely to be stepped on.
- SOLUTION 2: Run the cable to down the front of the stage and completely out of the way of the presenter.