
Program Board Film Event Setup
General Information
Film show times are usually 7 & 9:30 p.m. on Wednesdays, Fridays and Sundays unless otherwise noted. Films are free with a B.U. ID and paid current Community Activities fee, and are $1.00 for all others.
Patrons may bring food or drink into the movies. Tobacco products are not permitted in KUB.
Film titles, times, and locations are subject to change.
PB Film in the Ballroom (Rm 408)
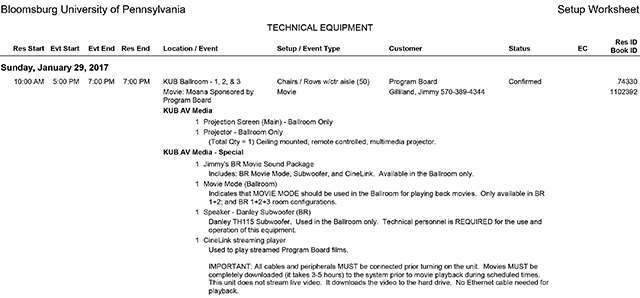
The reservation request from the Shift Report should look like this:
Setup Instructions
Part 1: Subwoofer Setup
Required equipment:
- One 50ft mic cable,
- One PowerCon-to-Edison power cable (should be stored with the subwoofer),
- Danley Subwoofer.
Subwoofer Setup Steps
- Position the Subwoofer in the room. Place the subwoofer in the center of the room with its back approximately 12 inches (1ft) from the wall.
- Prepare to connect. Remove the PowerCon-to-Edison power cable from the subwoofer grips. Remove the padded cover from the subwoofer.
- Connect the 50ft mic cable.
- Lay the male end of the mic cable, at AVP-3 (AV wall input panel 3).
- Run the female end of the mic cable to the subwoofer.
- Connect the female end of the mic cable to the male mic connection on the rear of the subwoofer.
- Connect the male end of the mic cable to the Subwoofer 1 output on AVP-3.
- Connect the subwoofer power cable.
- Using the PowerCon-to-Edison power cable, connect the blue end of the PowerCon cable to the blue power input of the subwoofer. Twist the PowerCon connector clockwise until the connector clicks securely into place.
- Connect the Edison end of the power cable to the wall electrical outlet.
- Power on the Subwoofer.
- Turn on the subwoofer by pressing the top of the rocker switch at the lower left of the rear of the subwoofer. IMPORTANT!! Turn off the subwoofer before unplugging it from power. Otherwise the subwoofer internal amplifier may be damaged!
Part 2: CineLink Connection
Required equipment: The CineLink (from Ken's Office).
CineLink Setup Steps
- Prepare the CineLink
- Unzip the front flap.
- Remove the remote control from the front flap pouch labeled "REMOTE".
- Unzip the rear flap.
- Take out the power cable from the back of the rack. IMPORTANT!! Do not attempt to remove the entire cable from the back of the rack!
- Take out the HDMI cable from the back of the rack. IMPORTANT!! Do not pull on, or attempt to remove the entire cable from the back of the rack!
- Connect the power cable to an electrical outlet.
- Connect the HDMI output cable to either HDMI input #1 or #2 of AVP-3.
- Power on the CineLink. At the front of the rack, push the CineLink's power button. IMPORTANT! Do not power on until HDMI cable is connected to video system. You will have to restart the CineLink!
Part 3: AV System Startup
Required equipment: The Crestron touchpanel (from the projection booth).
AV System Startup Steps
- Power On the AV system.
- Follow directions on the screen and touch anywhere in the darkened area to begin.
- Touch the power button image in the top left corner. After a few seconds, additional rack components should power on.
- Choose room configuration. Tap the appropriate room combination that corresponds to how the room is being used. Movie Mode can only be used in one of the configurations below:
- Ballroom 1+2+3 (all rooms combined)
- Ballroom 1+2/3 (BR 1+2 combined, BR 3 separate)
- Tap the back arrow or home button at the bottom of the page. This should take you to the AV Mode page.
- Enable Movie Mode. Touch the "Movie Mode" button.
- Select the source. Select HDMI 1 or HDMI 2 depending on which input you connected the CineLink's HDMI cable.
- Place your finger on the desired video source icon (i.e. HDMI 1, HDMI 2).
- With your finger still on the icon, drag the icon to the left side of the screen.
- Release your finger from the icon and touchscreen. You Should see the home page of the CineLink being projected onto the screen.
- Adjust volume as necessary (Figure 3).
Shutdown & Teardown Instructions
Power shutdown order:
- AV System
- CineLink
- Subwoofer
Part 1: Subwoofer
Part 2: CineLink
- Shut down using remote's power button or from the menu option. IMPORTANT! Do not just unplug it from power.
- Unplug HDMI cable from video system.
- Unplug power cable from receptacle.
- DO NOT (ATTEMPT TO) DISCONNECT CABLES FROM THE REAR OF THE UNIT. Neatly store cables within rear of the case.
- Return remote to front pocket.
- Zip the rear flap closed.
- Zip the front flap closed.
Part 3: Subwoofer
- Push the bottom of the rocker switch on the rear of the subwoofer. IMPORTANT!! Turn off the subwoofer before unplugging it from power. Otherwise the subwoofer internal amplifier may be damaged!
- Unplug power cable from the wall receptacle.
- Unplug the mic cable from the rear of the subwoofer.
- Unplug the mic cable from the AVP-3 input panel.
- Coil the mic cable neatly using the over-under technique.
- Place the subwoofer cover back over the subwoofer.
- Replace the PowerCon-to-Edison power cable from the subwoofer grips.
PB Film in the Multi-Purpose Rooms (345 A or B)
Using the CineLink
- Connect the CineLink HDMI output #1 to the Fireside Lounge IMP station HDMI input.
- Enter the passcode for the IMP station.
- Power on the projector (the projector will power on and the screen will descend).
- Select the Auxiliary HDMI source in the AV rack.
- Test the CineLink playback.
Using the Blu-Ray Player (in the IMP Station)
PB Film in the Fireside Lounge (Rm 240)
Using the CineLink
- Connect the CineLink HDMI output #1 to the Fireside Lounge IMP station HDMI input.
- Enter the passcode for the IMP station.
- Power on the projector (the projector will power on and the screen will descend).
- Select the Auxiliary HDMI source in the AV rack.
- Test the CineLink playback.
Using the Blu-Ray Player (in the IMP Station)
- Shut down using remote's power button or from the menu option. IMPORTANT! Do not just unplug it from power.
- Unplug HDMI cable from video system.
- Unplug power cable from receptacle.
- DO NOT (ATTEMPT TO) DISCONNECT CABLES FROM THE REAR OF THE UNIT. Neatly store cables within rear of the case.
- Return remote to front pocket.
- Zip the rear flap closed.
- Zip the front flap closed.